Wednesday, December 8, 2010

12 Days of Christmas

12 Days of Christmas Tree

We made this fun 12 days of Christmas Tree to hang up in our house to help our son learn the popular Christmas song.  I also thought it would give us a great opportunity to work on counting and number recognition.  
You can do a google image search for "12 days of Christmas"and come up with all sorts of pictures you can print.  Ours came from http://www.12days.com/library/12dayscoloringbook/default.htm
Things you will need:  scissors, crayons, printables, green and yellow construction paper, glue

It took a couple of sittings for him to finish the coloring...
 While he colored, I made the tree by glueing together 4 pieces of green construction paper.  Then I folded, started at the bottom and wiggled my way up the the point at the top. 

 For the star, I drew the star...
 folded it in half....
 and cut.
 After he was done coloring most of the pictures, I cut them out and started at the top and glued each picture on.  I then took a sharpie and wrote the number on each picture.

 He loves going to look at his work, trying to sing the song and laughs hysterically at "5 golden rings".  Its been a fun project, that I plan to save and pull out each year!

Wednesday, December 1, 2010

pattern play

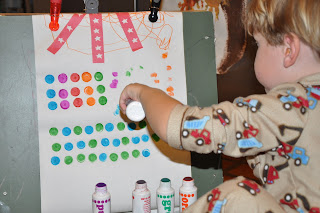
Today we broke out the easel, bingo dots (if you don't have these, please, go get them...they are FANTASTIC), stickers and worked on patterning.  I would start the pattern and he would complete the pattern or fill in the blank.   This is an easy lesson that is fun and artistic!  We do this pretty often.


See the big blue smear to the right on the above picture? This was one where I left a blank spot within the pattern.  It is a little more difficult for them to complete it within the pattern rather than at the end. 

Hope everyone had a GREAT Thanksgiving and is ready for the Holidays ahead!

Tuesday, November 16, 2010

Thanks Be to God "thanksgiving turkey craft"

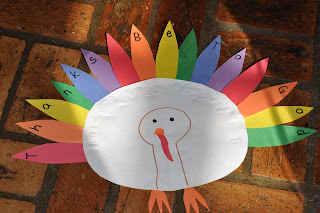
 I wanted to do a cute Turkey craft with my son for Thanksgiving, but I wanted to find a way we could do a little lesson at the same time... While making this Turkey, we practiced: sequencing & patterns, letter recognition, letter sounds, counting, pasting, sorting, and word spacing.

I started by cutting out a white circle (wish I had a brown paper bag on hand...tons of plastic bags, but no paper) and then drawing a turkey neck and face.  My son helped me cut out and paste the turkey's "wattle".  We laughed about the name of the appendage.  I cut out 16 colored feathers while he colored on the back of the turkey.  We also came up with a pattern for the feathers... we chose the rainbow pattern 
(Good 'ole Roy-G) 
 He loved lining them up in a line, and worked hard to make them straight.  He took great pride in his rainbow line.  While he was doing this I prompted him to find the next feather in our sequence by repeating the pattern aloud.  He does a great job with this. 
Then I wrote our Thanksgiving message "Thanks Be to God" and he said "oh no, mommy, this one is missing its letter!"  (see him pointing to the red feather below, so glad I caught that cute moment)  He was quite concerned.  I showed him that if we removed the blank feathers, the whole meaning would change ( it would be thanksbetoGod- which I said really fast) :)
Once we talked about our message, I decided to hide the feathers around our den for him to find.  We worked on counting during this time rather than letters, and he counted to 16 as he found each.
(yep...that's a wadded up sock there on the couch, please excuse it... )
anyway,  when we got back to the table, I wrote the phrase out again on another piece of paper for him to use as a pattern.  He rearranged the feathers to again give our message and then placed them under the turkey's body.
 Once each feather was in place, we lifted the turkey's body, put some glue around the top edges and flipped it back over the feathers and pressed down to set the glue.
Our little guy is proudly displayed in our kitchen, and we are Praising and Giving Thanks to God, indeed this Thanksgiving!
Thank YOU also, my sweet readers, for following my blog :) 
A Blessed Thanksgiving to you and yours!

Friday, November 12, 2010

Impatient Poppers

I hope this post doesn't come too late for those north of us (which is pretty much everyone), but here, it is a time I get very excited about.... Impatient Poppin' time!  I don't know if you have ever noticed, but impatients get little seed pods on them this time of year, and releasing those seeds will help your impatients come back year after year!  


 This is a picture of a seed pod that is ready to pop... nice, big and plump!
 you can pinch them off, like this, so that you can pinch them over a piece of paper, so you can collect the seeds and plant them into little cups, or you can leave them on the plant and let the seeds scatter on the ground and naturally propagate.  
(image from google image search)
this shows how tiny the little seeds are :)
It is so much fun to do, and I hate I didn't get a picture of Dodson and I doing it together, but we sure had fun, he squealed with excitement each time it popped!  Its a great little science lesson, too!

Monday, November 8, 2010

days of the week, days of the week, days of the week!

The other day, on Pajama Projects Facebook page, I posted a question to readers "What do you while still in your pajamas?"
The lack of responses made me realize that most of you, my readers, aren't sitting at the computer like me in the morning :)  Most moms I know get going about their day asap, and use "nap time" to do housework.  Some days I do this as well, but most days this is how it goes around our house...
When I wake up in the morning I need a wee bit of time after I make lunches, to unwind my mind and prep for my day- and drink the large amount of coffee that keeps me going.  I check email during this time, read a few mom blogs, think about my pajama project, what will become of my day, I pray and I do some of my housework.  During this time, Dodson usually watches some Umizoomi and some Little Einsteins and plays in his playroom.  I play on and off with him in this time, too.

I've been trying to organize my housework into daily, weekly and monthly tasks.  I wanted to share with you how I'm trying to organize my weekly tasks (yep... I do them in my pj's), not because you need help organizing, but because I hope you will respond and share how you handle your housework and still are an active parent at the same time!

As for my daily tasks, when I wake up, I...
  1) make lunch for my husband, feed him and get him out the door
  2)  drink my coffee and take a bit of time for myself
  3) start the daily laundry
  4) make beds
  5) unload dishes & wipe down kitchen counters
  6) pajama project
  7) get dressed!!!
  8) get out of the house while its clean!

There are also those tasks that don't need to be done daily, but should be done often, this is how I sort those...
I know this is TOTALLY dorky to do this, but it is how I remember to do everything that needs to be done in a house during a week...
    Mondays:  "Manage it Mondays" = get together budget, meal plans, grocery list, sort through bills and make a grocery run
    Tuesdays:  "Tub and Toilet Tuesdays"= scrub out the tubs and toilets :)  such a LOVELY job
    Wednesdays:  "Wipe Down Wednesdays" = I go to town with my clorox wipes and hit the tabletops, light switch covers, doors and door knobs, counters, bathroom counters, swiffer dust the blinds & window seals
    Thursdays:  "Transportation Thursdays"= clean out the NASTY car (it is like a BOMB goes off in it) and restock all necessities (i keep some snacks, extra clothes in case of accidents, sunblock, wipes, hand gel, socks and shoes, books and some toys, first aid kit, stroller)
    Fridays:  "Fridge and Floor Fridays"  = clean out the fridge & throw away all the left overs that just sit there and never get eaten...  sweep floors and vacuum the carpeted areas
   Saturdays:  "Swiffer and Steam Saturdays"= swiffer the floors to remove dust, and then steam them!
   Sunday:  "Swap sheet Sundays" = put some fresh sheets on the bed... but most of all, Sunday is      Funday!

How do YOU manage it all???  Then, how do you find time for yourself in the mix???
  

Thursday, October 28, 2010

its a bird, a plane, it's HOT GLUperman

I couldn't stand to put the store bought costume on D. for Halloween.  This was a super easy & cheap last min. costume that takes ZERO sewing skill.  All you need is hot glue, felt and a blue shirt and pants.  I purchased the Garanimals Wal-Mart shirt for and sweatpants for $7.00 total.  I purchased red and yellow felt.  
To make the "logo" I simply folded the red in half and free handed the shape.  Then I used the red as a pattern for the yellow and then went back and trimmed it a little around the edges to make it smaller than the red one.  Then I decided to put a D for my little man, to make him feel special!  He is pretty super, after all!

The "bloomers" were the hardest part, and all I did was double the red felt, laid the pants on top with the crotch of the pants at the fold.  Then I cut up the next to the sides of the pants and cut across the top at the waist, and went back down the left side of the pants.  So, when unfolded, I ended up with a large rectangle.  Then I just angled the corners, up towards the pockets and glued in place. It doesn't quite match up on the sides, but I'm not worried about that.  It know that its not perfect, nor does it need to be.  


 For the belt, I just cut a strip of yellow and glued it around the bottom of the shirt.
And to do the cape, I folded the fabric in two and cut lengthwise with a taper.  Then I hot glued it to the back top of the shirt.
Hopefully it will stay together though the evening :)
Happy Halloween, and have a BLAST trick-or-treating!
Jenny

Friday, October 22, 2010

SPooky SPiders, SKulls, SKeletons and Centipedes


Today We talked about letter blends and like sounds (b/c D. is starting to sound out words).  I had some SPooky Halloween "decorations" around and thought they would be perfect for sorting out our sounds.  We talked about how S and C can make the same sound and that we can build letters to make more sounds.  (It is so hard to teach how to read, isn't it!)
here are the supplies we used for the fun:
glue, foam pumpkin cut outs (orange construction paper would work)
sticky poster letters (you can draw them on), halloween SPiders, SKulls, SKeletons and Centipedes.
Then we began sorting, based on the sounds we heard.  
"Spider starts with what sound?" "S, Ssssss"
"Great, what's the second sound?  S PPP"  "P!"
"Fantastic!"
We did this with all the sounds.  Centipedes was difficult, so I told him it sounds like an S, but is actually a C. 
We counted the Spiders to work on those math SKills, too!

 After our lesson, we went outside, hid the spookies in the sand and went on a spooky treasure hunt!
It was a fun morning!  Enjoy!

Happy Friday...
Jenny @ Pajama Projects

*I'd really appreciate a link back if you use, adapt ideas, or just want to be nice :)*
*I am being compensated in no way for any products being mentioned, but wouldn't mind some cash, so contact me if you are interested in advertising, or offering products for review*

Wednesday, October 20, 2010

Leafy Letters Falling Down, Falling Down, Falling Down...

Amy, over at the TeachMama blog, (I'm sure all of you already follow her blog...right!?!) shared this fantastic idea last year of writing letters on fake fall leaves.  The fall leaves I bought at the craft store this year for our fall mobile (previous post) must have reminded me of her idea.  Anyway, I did as Amy suggested and wrote the letters (upper and lower) on each left over leaf with a sharpie.  I couldn't find Amy's post, or remember the fun games she played with hers, so I tried to come up with a way to use them on my own.  
I wanted to re-create the look of leaves falling and have D. catch them and call out the letter.  So, I climbed up on his swing set (quite a challenge) and had him stand below.  Luckily it was a windy day, so it made the game more fun.  I tossed the first leaf below and he squealed as he tried to jump to catch it.  I sent the whole alphabet flying, and he loved catching them!  Then he wanted a turn tossing them down to me.  We switched the rules, where he would call out the letter on the leaf before he tossed it.  It was a fun way to experience our "faux fall" and practice our letters!


Check out TeachMamas afore mentioned post to find other games you can play with the letter leaves by clicking on the link.
Happy Fall Y'all!
Jenny

Monday, October 18, 2010

where the leaves don't change

In our neck of the woods, there isn't much of a "fall" to speak of.  It pretty much goes from blazing hot to  cold.  While we do have a few great, crisp weeks, we do not have the lovely changing of the leaves that I loved to see growing up.  I hate that Dodson is missing out on that.  We have discussed taking a trip to "the mountains",  but that would involve about 10hrs in a car to get to "the mountains" from where we are.  So.... I decided to give my son a taste of what fall looks like, right here in our house.  
This is all that is needed... a branch, some twine, scissors and a bundle of fake fall leaves.

First, we hung the branch from our kitchen light fixture...this can be done anywhere.

Then D. picked the leaves he wanted on it.  We talked about the different colors of fall.

 Mommy cut lengths of ribbon and tied the leaf to the branch.  I wanted to create the illusion of the leaves falling...

As they say down south... "happy fall, y'all"

Tuesday, October 5, 2010

Think Fun's 36 cube

 This is our own way to use Think Fun's 36 cube.  You can find this puzzle and the real way to use it by clicking ... here.  For those of you that like those golf tea puzzles at Cracker Barrel - this one is for you, but it's a bit more challenging.

 We play with this almost daily.   We play with it in our own way.  We sometimes sort by color- get all the greens together, all the oranges, and so on.  Then we sort them from shortest to tallest or tallest to shortest.  Sometimes we put all the tall ones together, and then group them by size rather than color.  There are so many ways to play with them.  They also have grooves in them, where they are sectioned, so we can group by the number of sections each has as well.  This helps improve counting skills.  Overall, we have not used this game as intended at all, but have found it to be one we go to often and are always finding new fun and educational things to do with "it".  Check it out...it really is a good one for all the family (for different reasons)
P.S.- we got ours at Fantasy Island Toys in Fairhope.

Monday, September 27, 2010

Fall on our Fingers

This morning we fell in love with fall... it happens every year.  You wake up, walk outside, and it is that beautiful, breezy, crisp, bright, cool, but still warm day.  I LOVE it.  Growing up we always called it "football weather", for obvious reasons.
I want D. to appreciate this change in the seasons, as well.  Fall brings so much fun and I want him to FEEL the excitement!  We have been talking about the change in the weather, and how we've noticed the wind picking up.  We go outside and lay in the grass and look up and watch the trees blow back and forth as leaves spin though the air.  It's so fun!
I went and purchased some fall colored paints last week and this morning thought of painting a tree and having the leaves "change color".
I drew/painted the trees on a few pieces of paper and then painted D.'s hand with the green paint and let him make handprints on the branches (with some guidance), then we added yellow, then orange, then red and then brown.  As the colors were layered they changed and merged together, just like they do on the leaves.  He loved this project and we ended up with a few different pieces of "fall art" to hang up.
We will continue to talk about the color change as we witness it in nature over the next few weeks.
Enjoy this BEAUTIFUL day!